Microphone access permissions
Your digital employee is configured in voice mode, you can hear its voice, but when you activate the microphone, the system prompts you to allow your browser to access the microphone to continue!
The very first time you use a site that requires microphone access, the browser asks you to allow it. However, if you declined, the prompt will not appear again on subsequent visits. You therefore need to go into the browser settings to re-enable the microphone.
Microphone permissions depend on your browser, your operating system (Windows or macOS), and the device you are using (desktop computer, iOS or Android mobile, or tablet).
Allow the microphone in a browser
Chrome on desktop
From a desktop or laptop computer, follow these steps to allow Chrome to access the microphone:
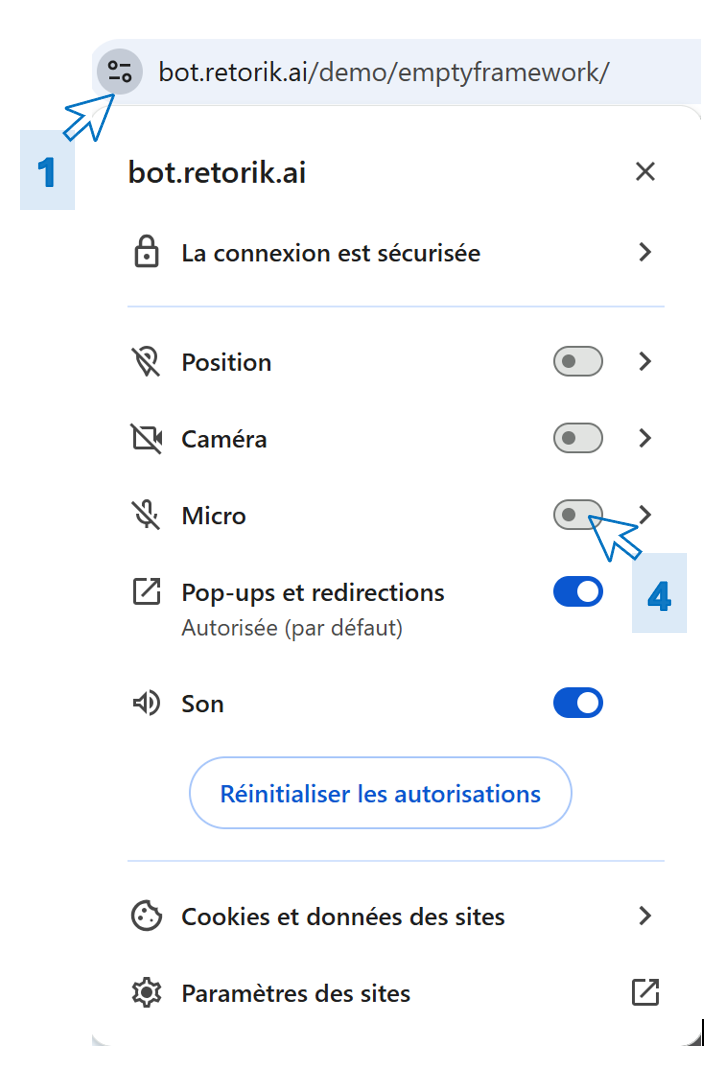
- On the browser tab where your digital employee appears, click the icon to the left of the URL bar.
- A menu appears with camera, microphone, and sound options.
- Check that the microphone toggle is enabled.
- If it is disabled (greyed out), click the toggle to switch it to the "Enabled" state: this will allow Chrome to access the microphone or any other checked item for that site.
- Close the popup using the X in the top right corner.
- Refresh your tab and click the microphone: it should animate and your words should be transcribed on screen.
- If these steps are not enough to resolve the microphone access issue, go to the Allow the microphone on Windows 10 section.
Chrome on mobile or tablet
On an Android mobile or tablet, when you choose voice mode to interact with the digital employee, the first time you activate the microphone, Chrome asks you to allow microphone access for that site. Make sure to select Allow.
If the microphone has been blocked, the user interface will alert you. Follow these steps to re-enable the microphone:
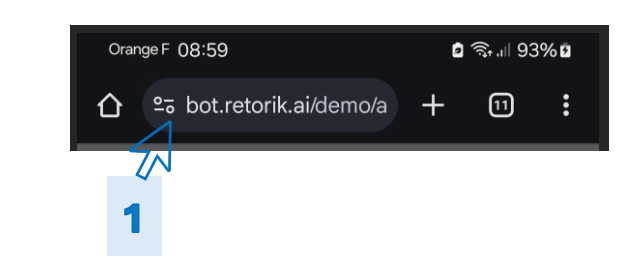
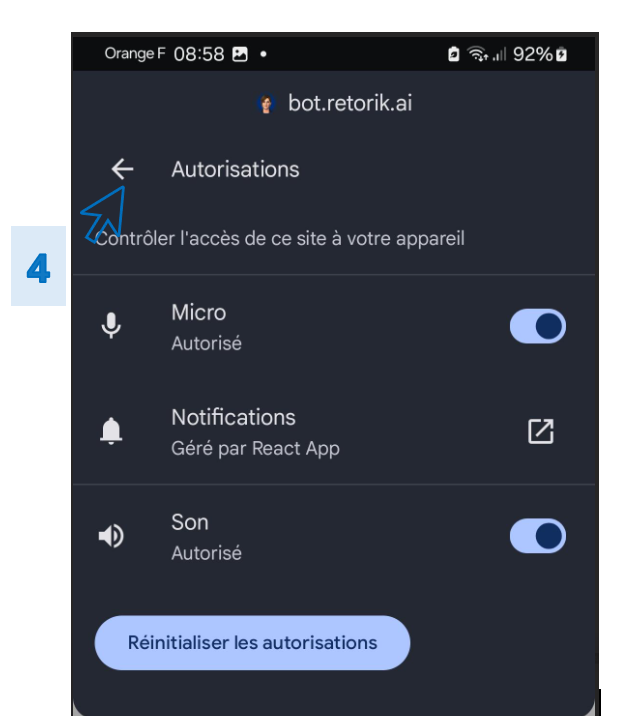
- On the browser tab where your digital employee appears, click the icon to the left of the URL bar.
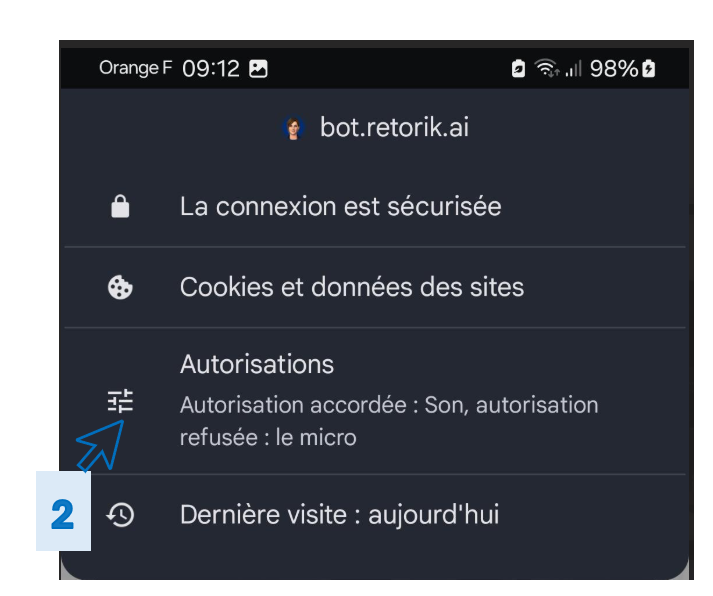
- A menu appears with a Permissions option showing the permissions granted and denied. If the microphone is denied, click on that option.
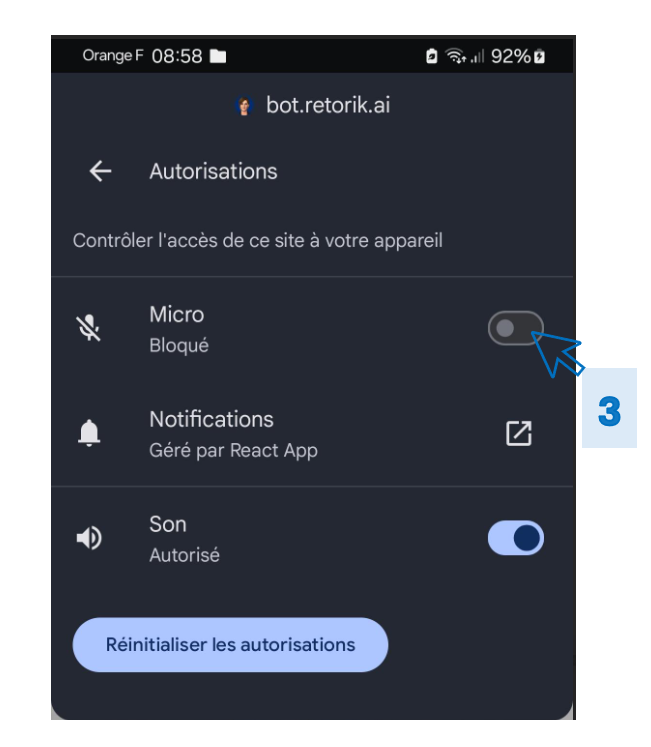
- Click the toggle to switch it to the "Allowed" state; this will allow Chrome to access the microphone or any other checked item for that site.
- Close the popup using the back arrow in the top left corner.
- Click the microphone again to speak to the digital employee: it should animate and your words should be transcribed on screen.
Firefox on desktop
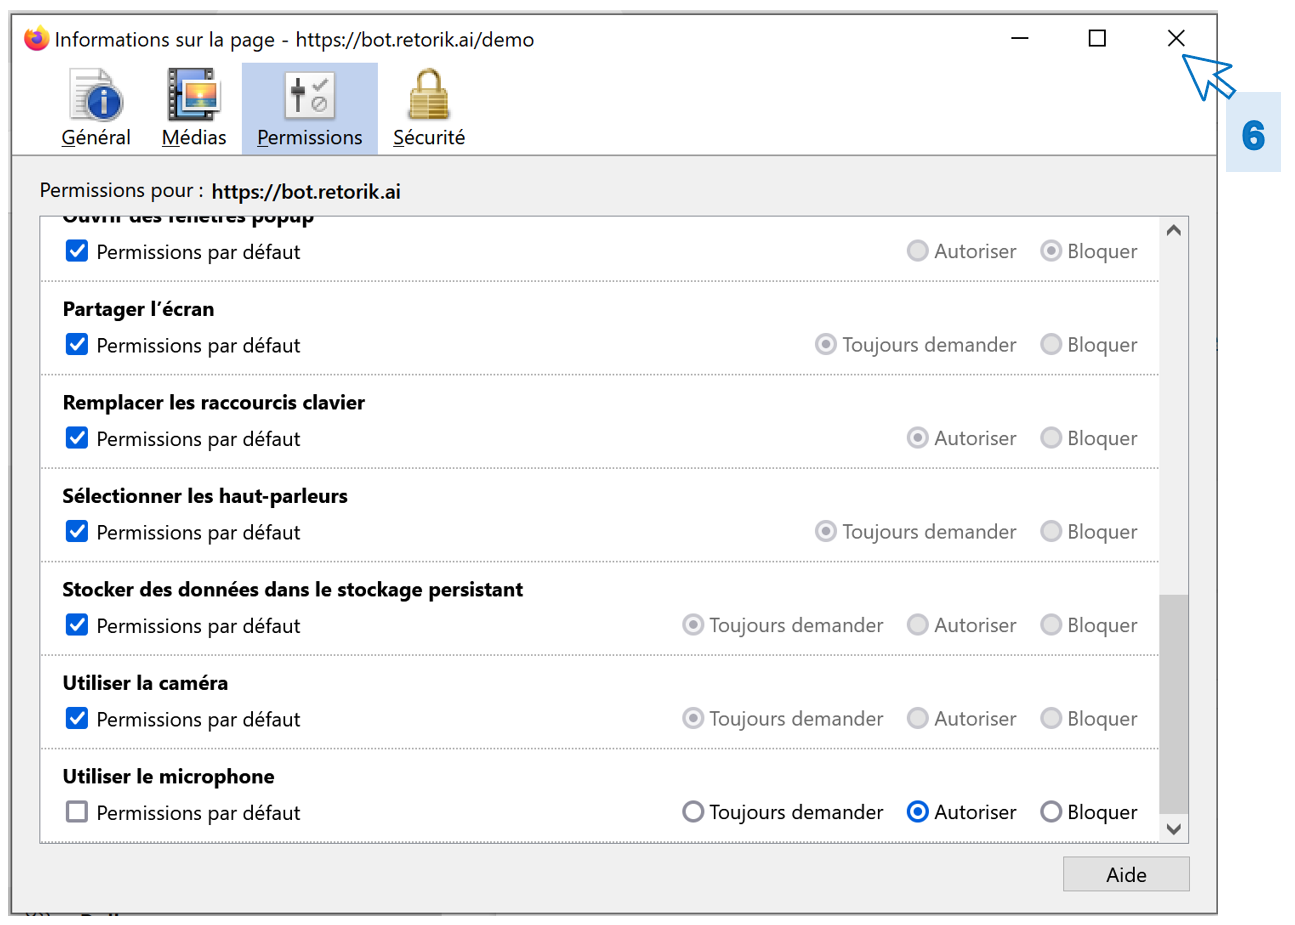
From a desktop or laptop computer, follow these steps to allow Firefox to access the microphone:
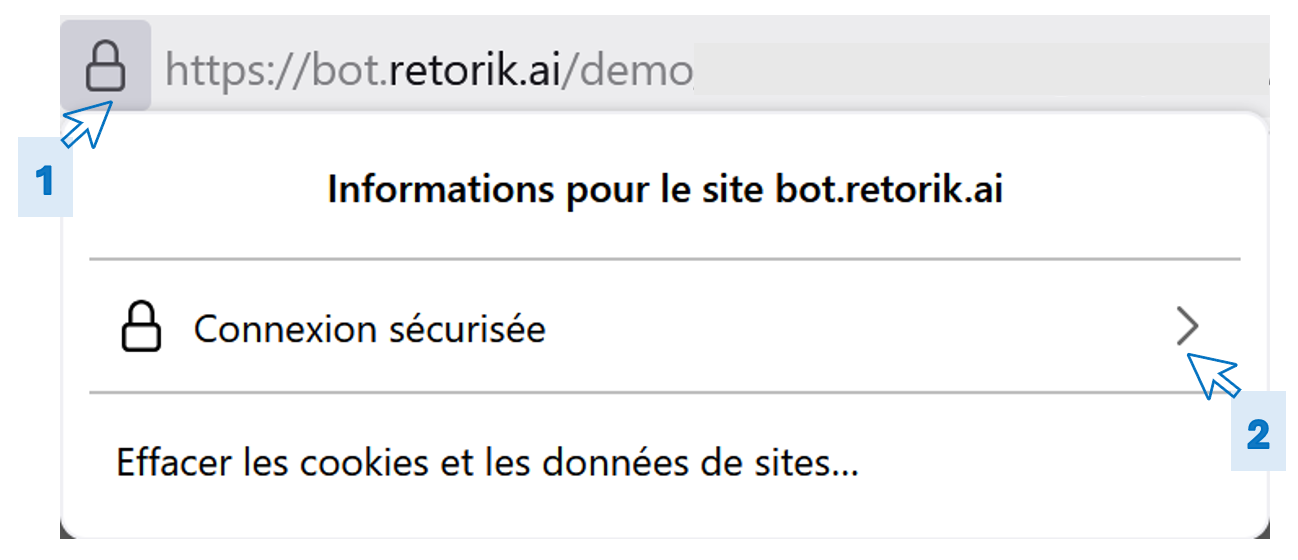
- Click the padlock icon to the left of your URL bar.
- Open the Secure Connection dropdown menu.
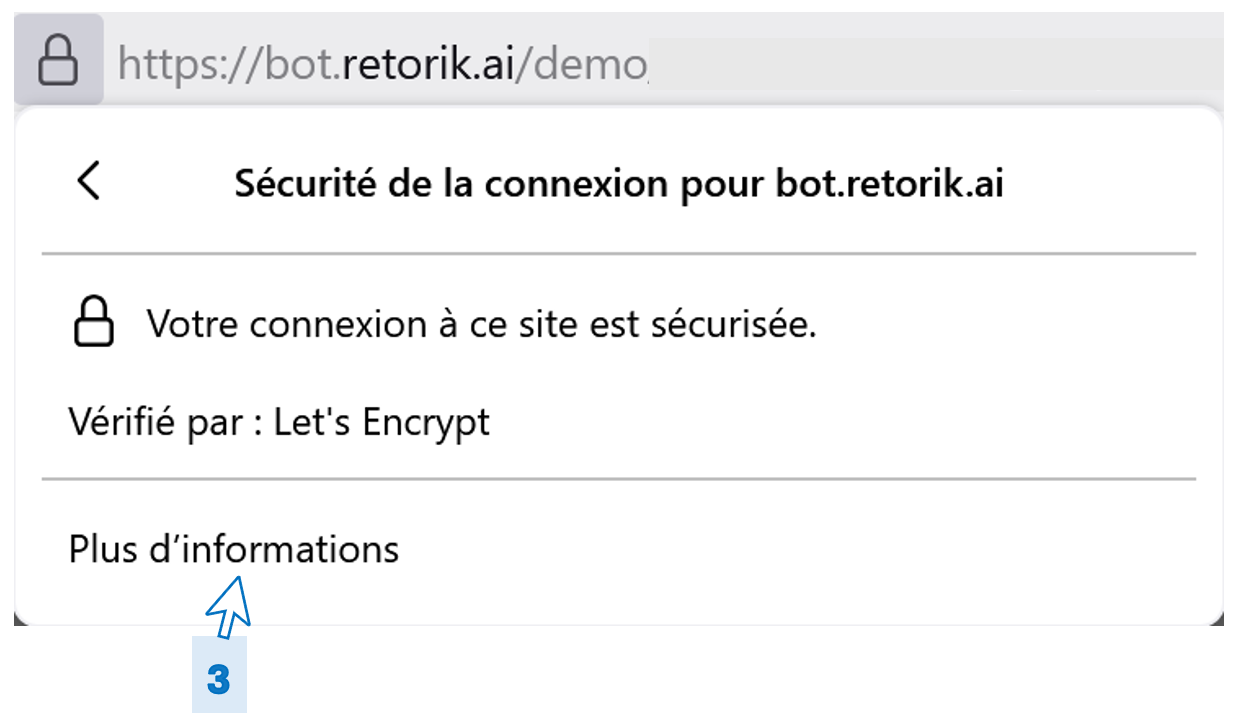
- Click More Information.
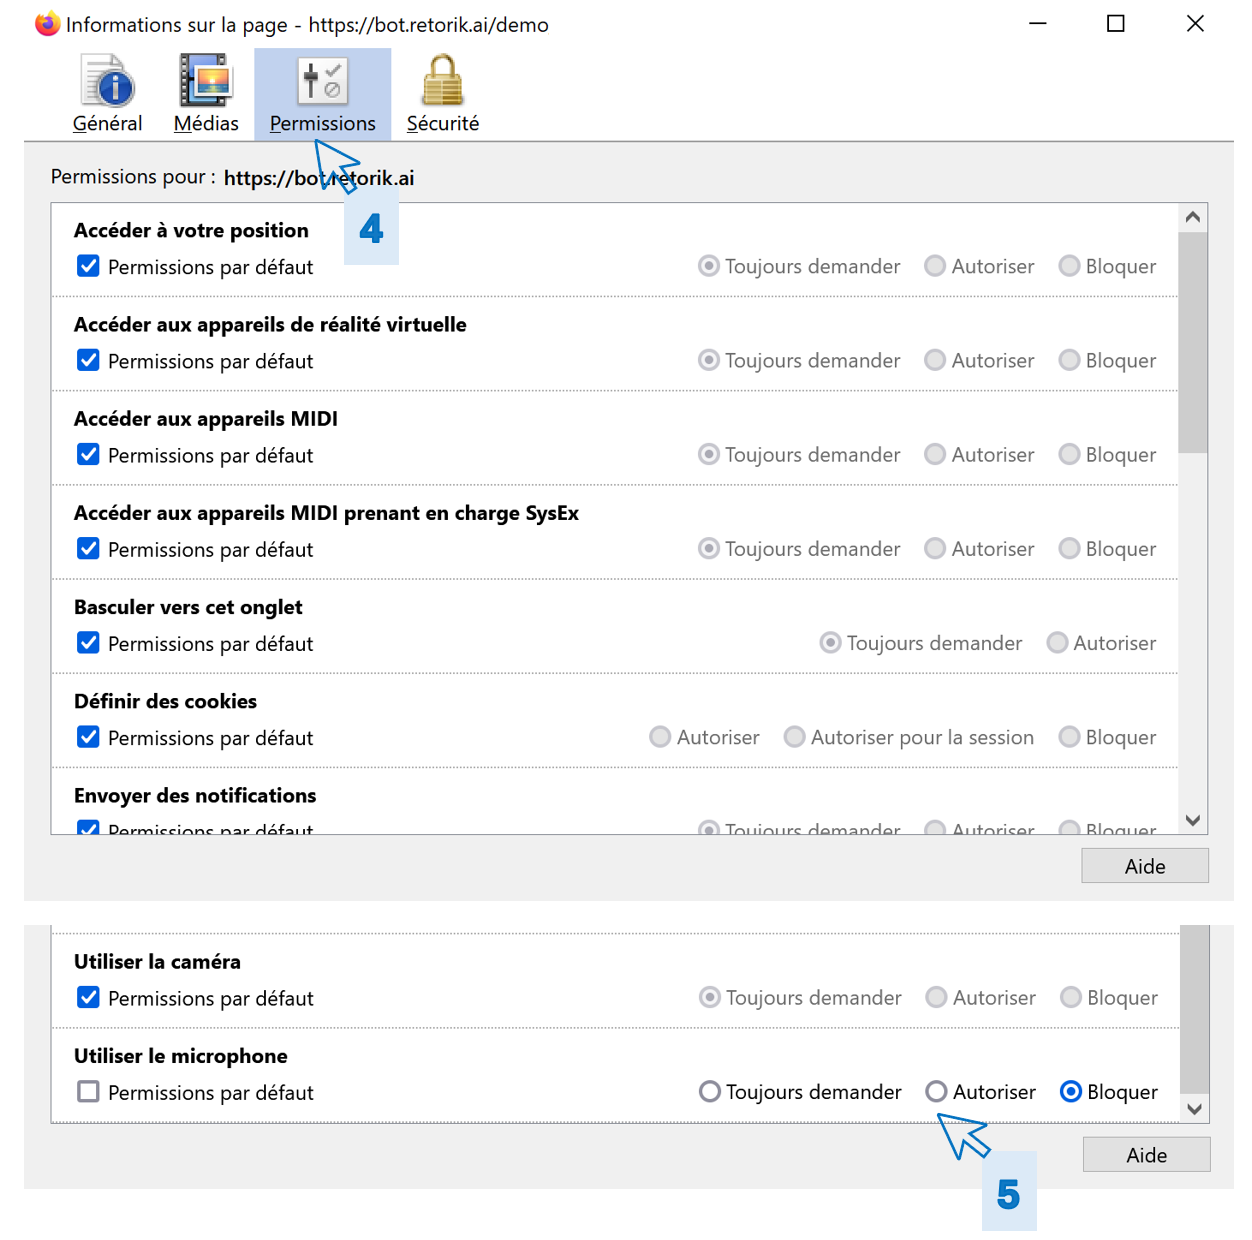
- Click the Permissions tab and look for Use the Microphone in the permissions list.
- If the permission is set to "Block", click the Allow radio button to allow the Firefox browser to access your microphone.
- Close the window using the X in the top right corner.
- Refresh your tab and click the microphone: it should animate and your words should be transcribed on screen.
- If these steps are not enough to resolve the microphone access issue, go to the Allow the microphone on Windows 10 section.
Firefox on mobile or tablet
Edge on desktop
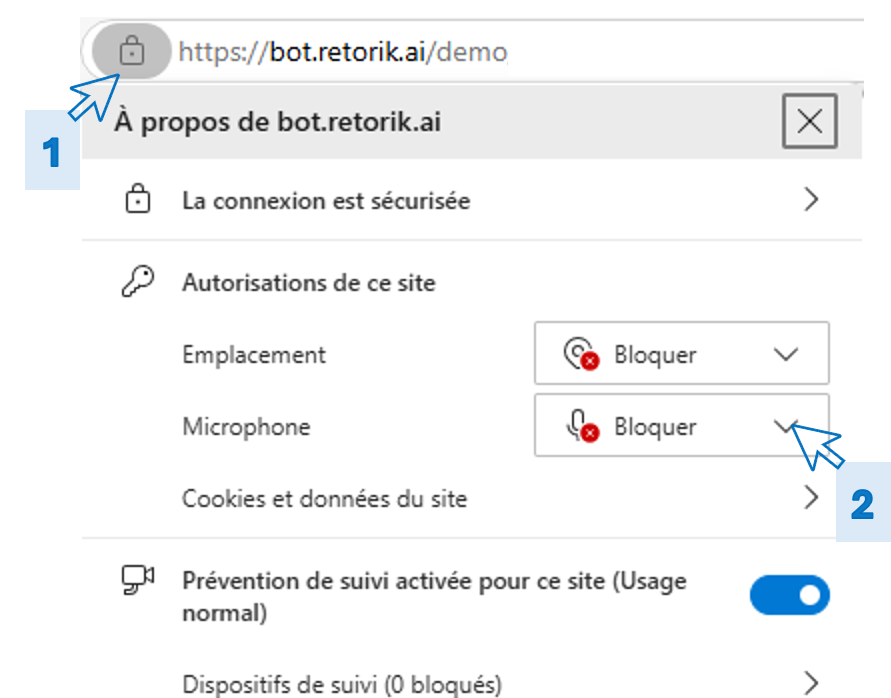
From a desktop or laptop computer, follow these steps to allow Edge to access the microphone:
- On the browser tab where your digital employee appears, click the padlock icon to the left of the search bar.
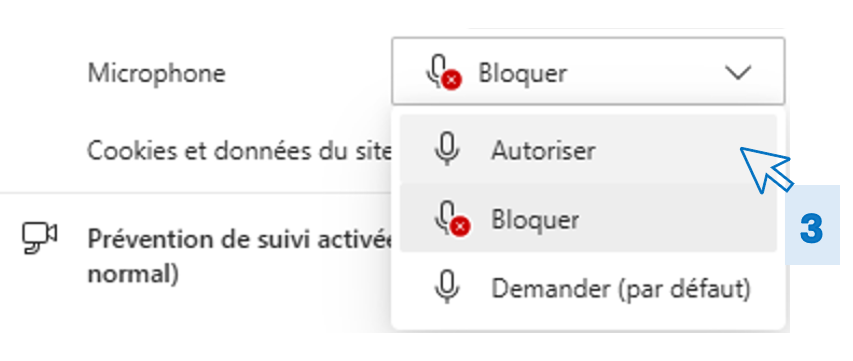
- Open the dropdown list next to Microphone: the microphone should be set to Block.
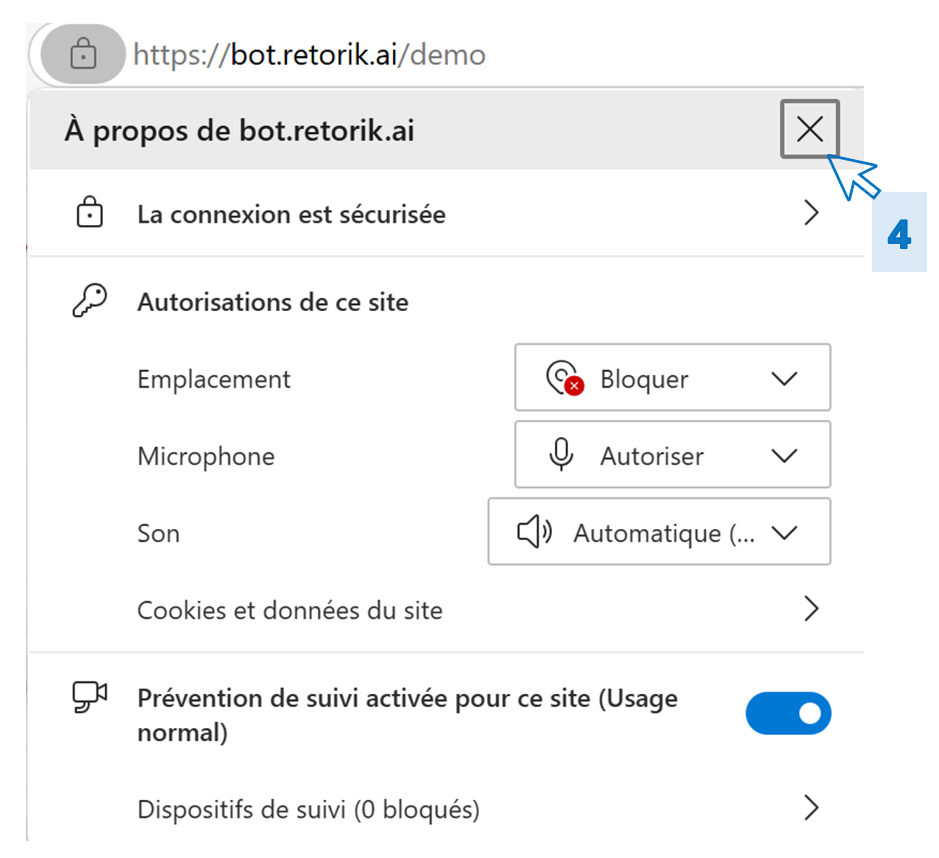
- Set the microphone to Allow.
- Close the window using the X in the top right corner.
- Click the Refresh button to update the browser tab.
- Try asking the digital employee a question again by clicking the microphone: it should animate and your words should be transcribed on screen.
- If these steps are not enough to resolve the microphone access issue, go to the Allow the microphone on Windows 10 section.
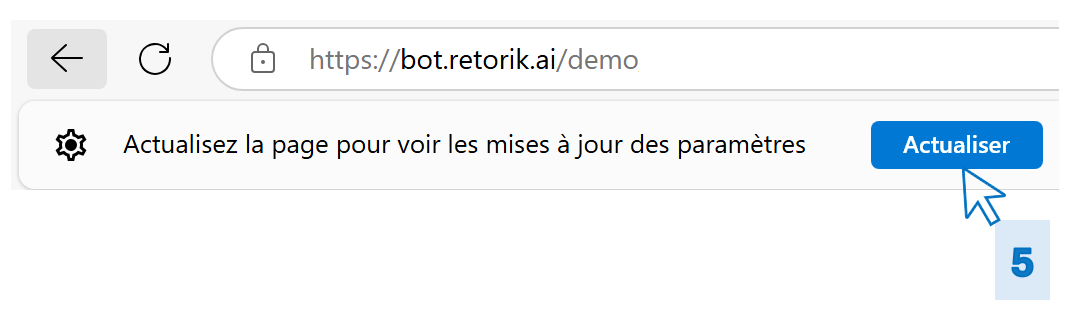
Edge on mobile or tablet
On an Android mobile or tablet, when you choose voice mode to interact with the digital employee, the first time you activate the microphone, Edge asks you to allow microphone access for that site. Make sure to select Allow.
If the microphone has been blocked, the user interface will alert you. Follow these steps to re-enable the microphone:
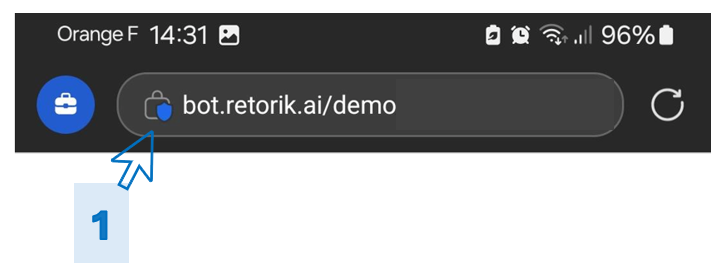
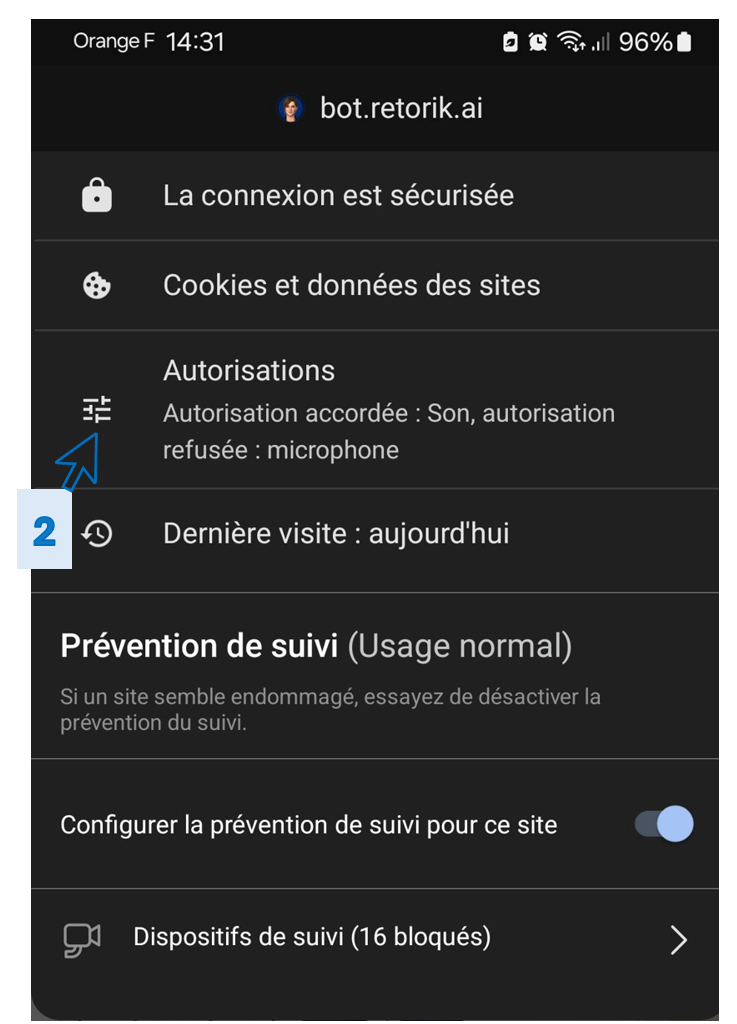
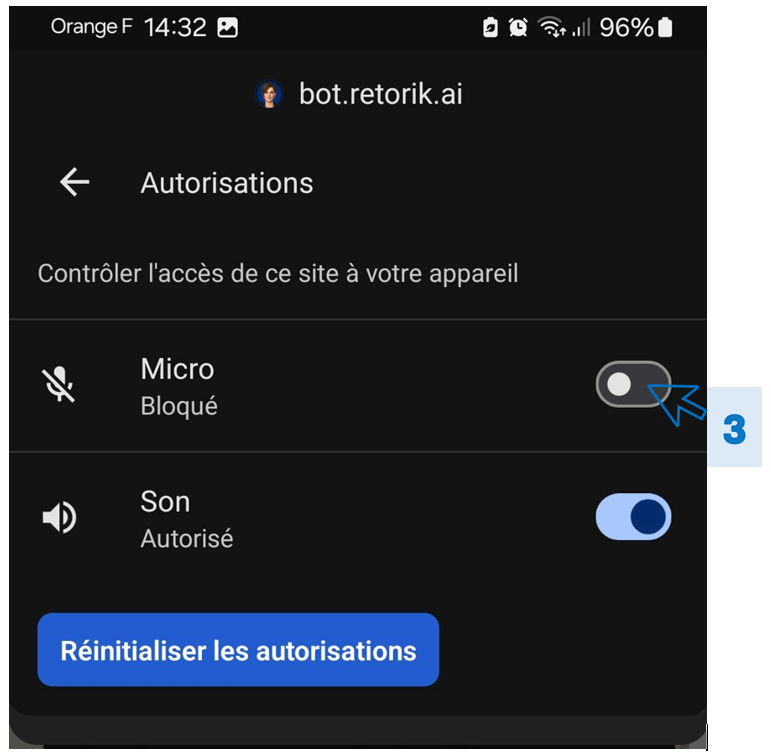
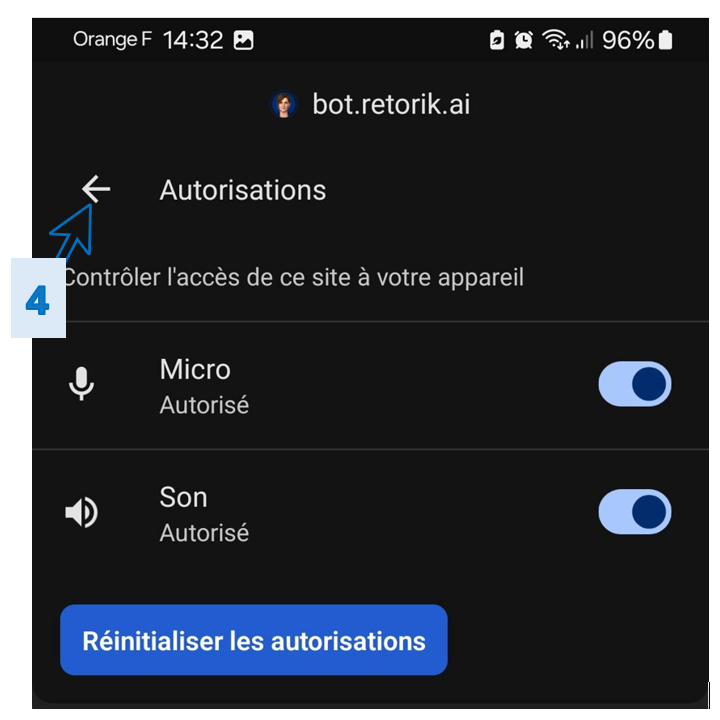
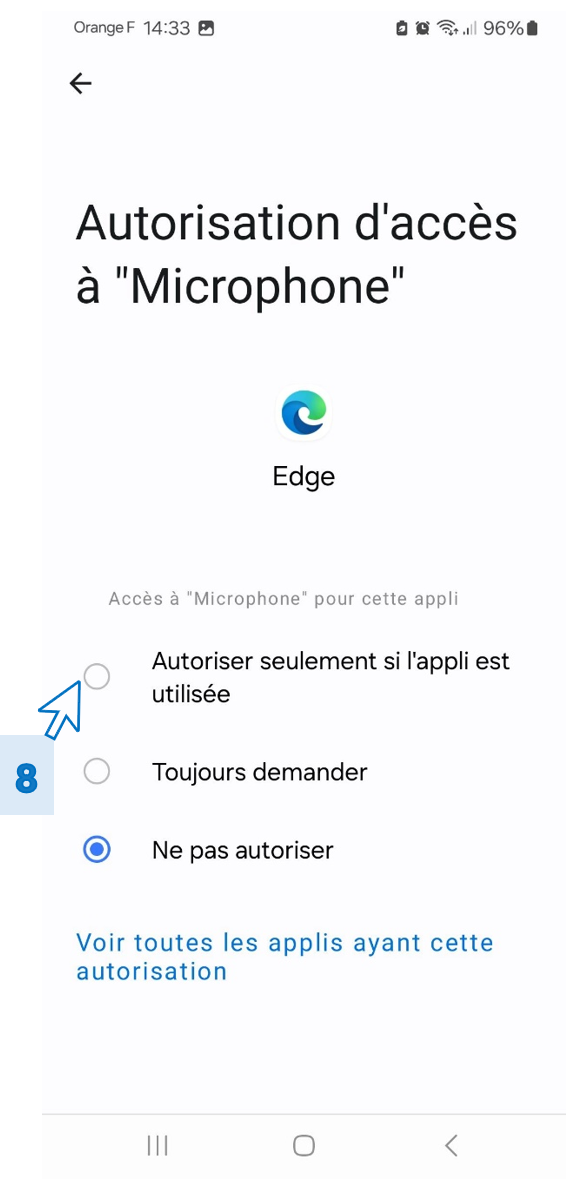
After step 4, Edge may ask you to enable its permissions in the Android settings. Click the Android settings link and follow these additional steps:
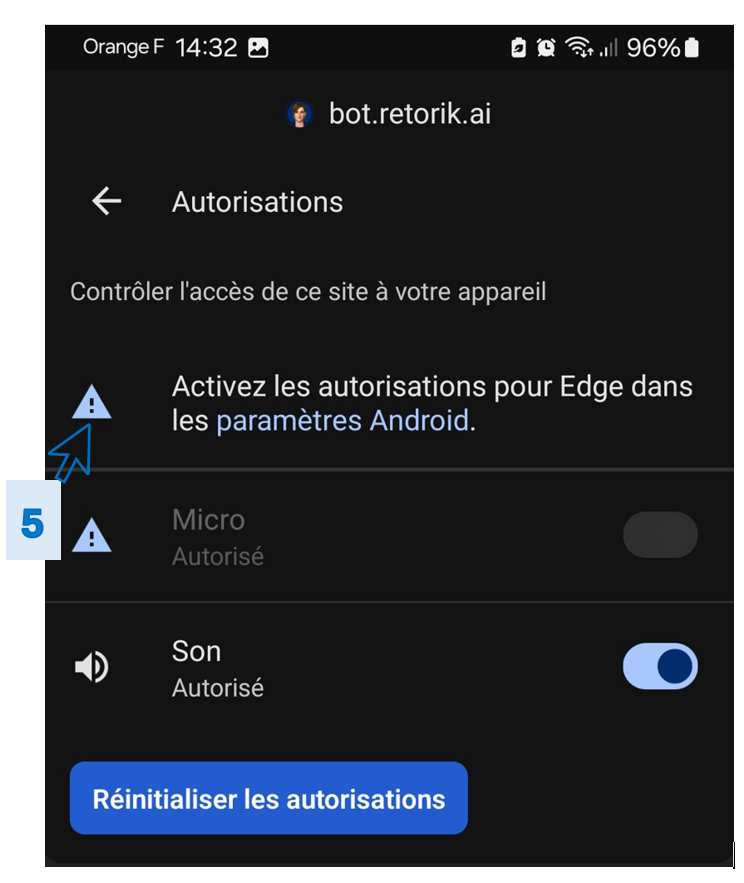
- Select Permissions.
- Scroll down to Microphone and click on it.
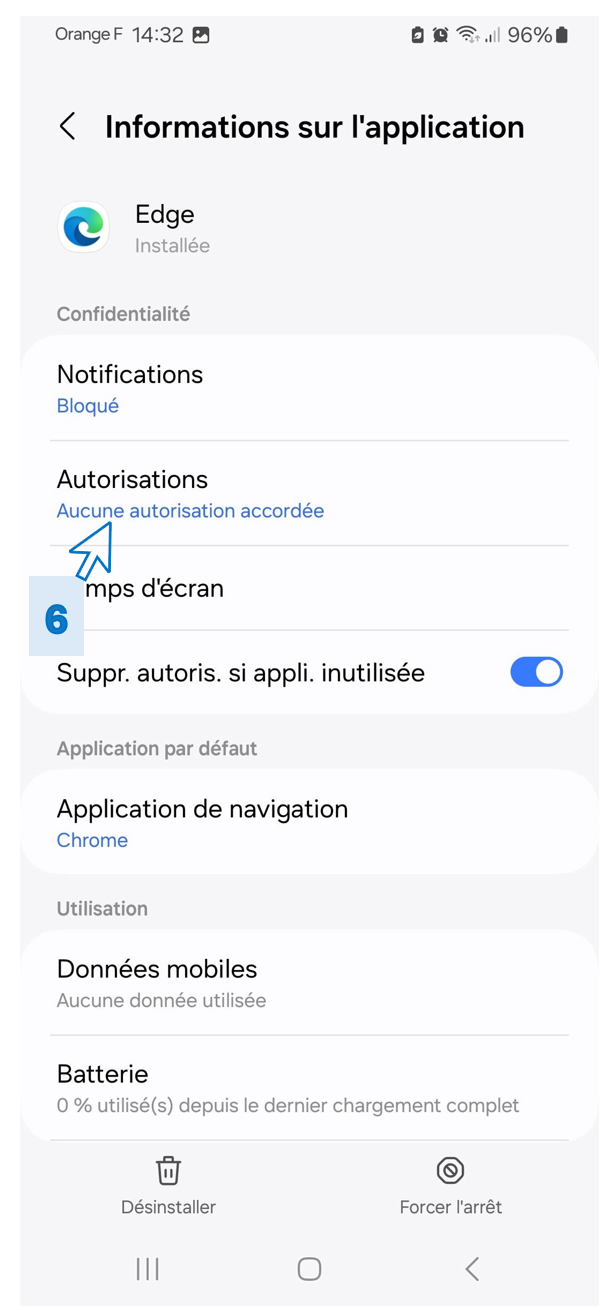
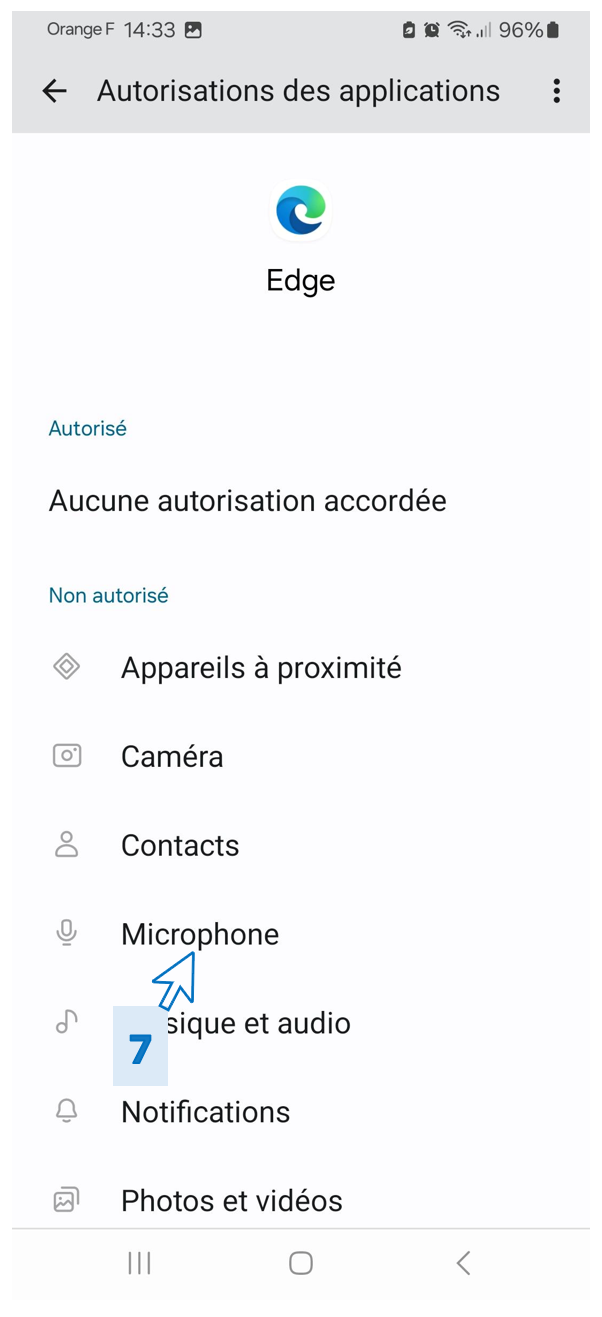
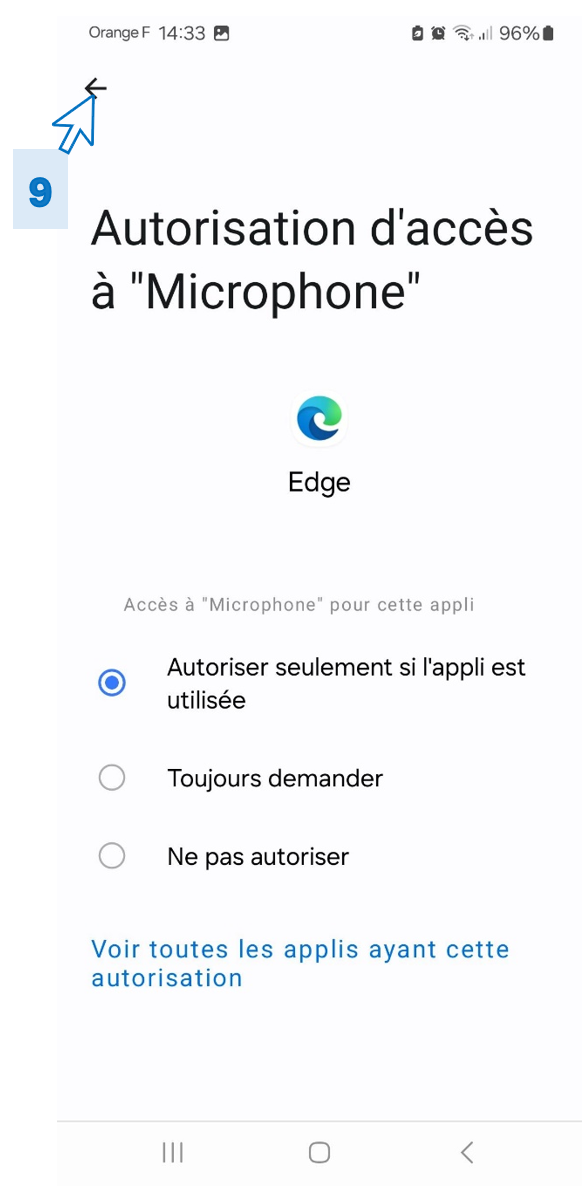
- The microphone permission is set to "Do not allow"; click one of the other 2 values.
- Exit this page and refresh the agent URL.
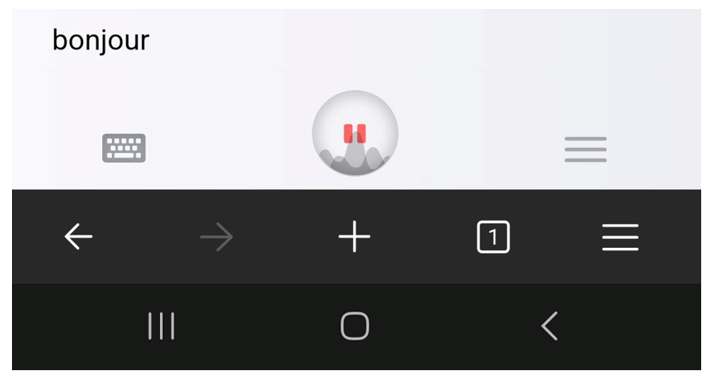
- Click the microphone again: it should animate and your words should be transcribed on screen.
Samsung on mobile or tablet
Safari on desktop
From a Mac, follow these steps to allow Safari to access the microphone:
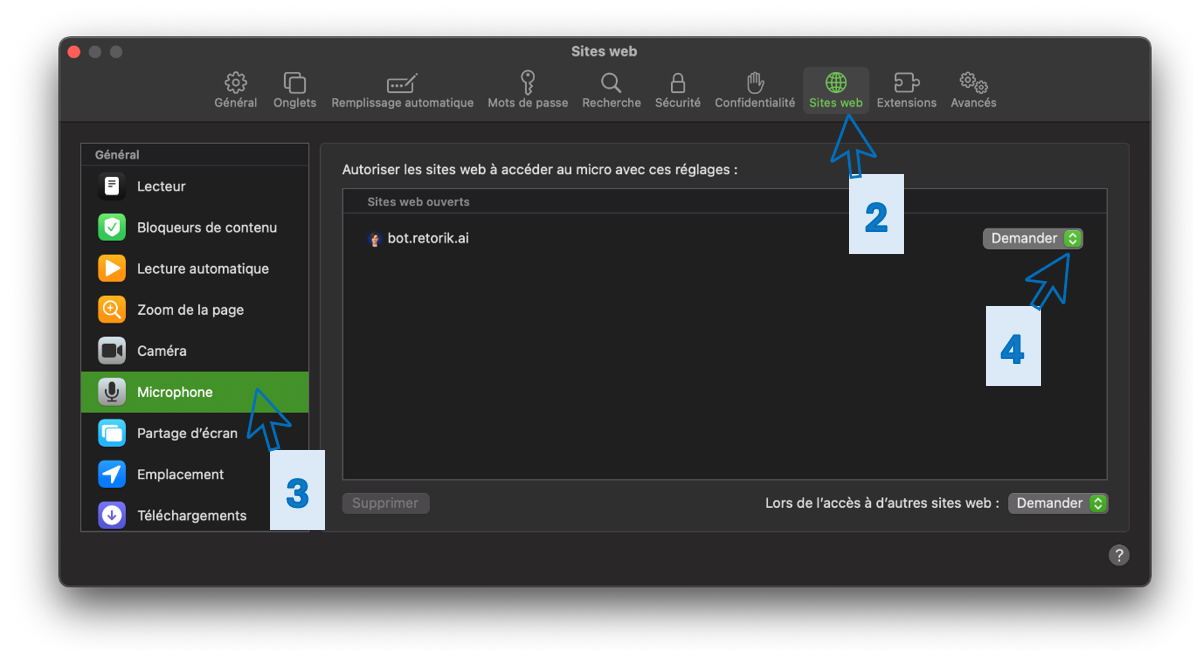
- Go to Safari > Settings
- In the settings window, click the Websites tab
- Select Microphone from the left-hand menu
- In the list of open websites, select Allow from the dropdown menu for bot.retorik.ai
- Close the settings window
- Refresh the URL.
Safari on mobile or tablet
In voice mode, when you activate the microphone in the user interface, Safari asks you the first time to allow microphone access:
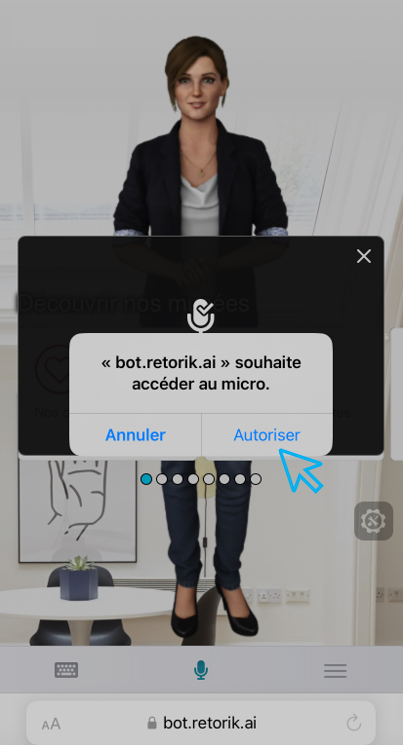
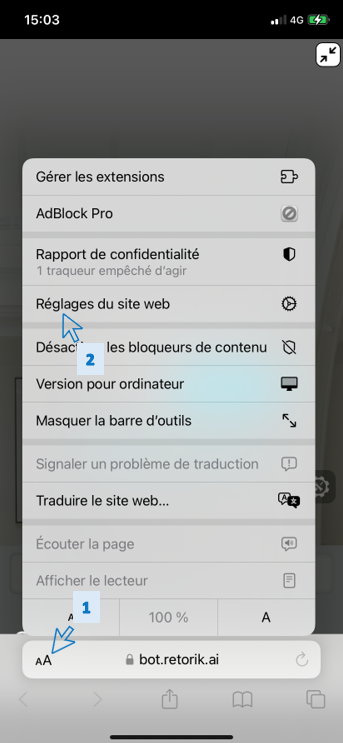
If you click "Cancel", Safari will no longer request microphone access for that website afterwards. To re-enable the microphone, you need to reset the microphone access settings. In that case, follow these steps:
- In the address bar, click the aA icon on the left.
- Select Website Settings from the list.
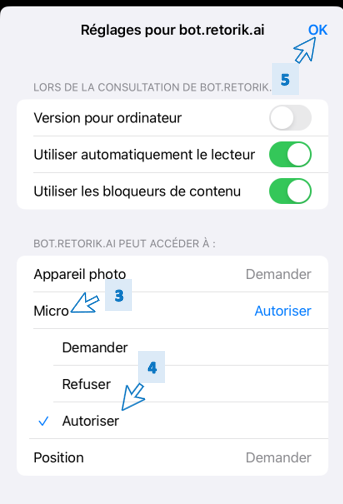
- In the "BOT.RETORIK.AI CAN ACCESS:" section, check the microphone status.
- If Deny is shown, click Microphone and select Allow from the list of values.
- Save the settings for this site by clicking the OK button at the top of the screen.
- Re-enable the microphone in the digital employee interface: the microphone should animate and your words should be transcribed on screen.
Allow the microphone in the operating system
Allow the microphone on Windows 10
To allow microphone access in the Windows 10 system settings, follow these steps:
- Open the Start menu in the bottom left corner of your screen and go to Settings.
- Open the Privacy tab.
- Scroll down the left-hand menu to Microphone.
- Make sure the Allow access to the microphone on this device option is enabled. If not, click the "Change" button and toggle the switch to "On".
- Make sure the Allow apps to access your microphone option is enabled. If not, toggle the switch to "On".
A Windows update may be available:
- Go to the Update & Security tab.
- Select Check for updates.
This will ensure that Windows has the latest camera and microphone drivers needed to work in your preferred browser.
Allow the microphone on macOS
To re-enable the microphone on macOS:
- Open System Preferences
- Go to Security & Privacy
- Under the Privacy tab, make sure your browser is selected to have access to the Microphone option.
- Restart the browser.